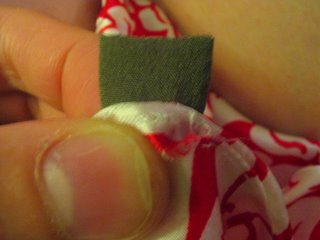
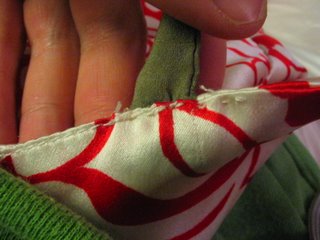
Before you pick up a needle, make sure the strap isn't twisted around--there's nothing worse than spending all this time sewing the strap back in, only to find out you've screwed up. Line up Point A (the point to which you want the strap shortened) with the creased edge of the outside lining, above where the old holes are. As you can see from this pic, the "right" side of the fabric is folded over (forming the creased edge), then the folded-over side is sewn to the strap. We want to reuse the old holes for a couple of reasons: 1) we don't want to make any more holes in the delicate fabric than necessary, and 2) the old holes is a guide on where to sew, and having that guidance saves us a lot of time and trouble.
 Attach the strap to the outside lining. You should start the first stitch by threading the needle through an old hole in the lining, from bottom to top. Next, get that needle up through the strap. When the needle comes down through the strap, make sure it goes through an old hole in the lining (or as close as possible). The needle should go through only 1 layer of the lining, not two...since the edge is folded over, it's easy to get both layers. Once you get it started, doing backstitches should be easy.
 The tricky part is attaching the strap to the inside lining. At this time, you want the outside lining facing you so that you can keep track of how good the outside looks. For the first strap I modified, I decided that it would be better if I sewed both layers of the lining together through the strap, even if a little bit of the stitches will show in the front lining. I opted for security (such that the strap will stay on) over aesthetics. As you sew, hold the layers in place with your finger tips. To minimize cosmetic concerns, use really small stitches.


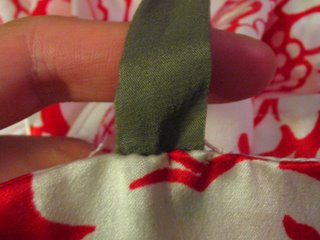
Finished product: the strap isn't completely flat (you can see a slight kink) and my stitches weren't completely straight, but they get the job done. My lousy handiwork isn't immediately apparent.
For the second strap, I decided to try a different approach. Instead of sewing all the way through the outside lining, I sewed just through the strap and the inside fold of the outer lining. As you can see, the stitching is messier on the inside lining, but it's not open to the public anyway. This strap is also not perfectly flat, but no stitches are visible on the outside. This is actually a better method.


Alas, shortening the straps did little to solve the low cut problem. If you think this is bad, think of how much worse it was before.
 At least now I can wear it without worrying about the risk of indecent exposure. I also learned a valuable lesson on shortening straps, a skill that I can use on a couple of other tops.
Next time I'll talk about damaged specials--which ones are salvageable, and which ones are not worth it.

5 comments:
You could always try to wear a t-shirt or tank top underneath to make it less risque?
Nice job on the straps. =)
Thanks!
Yeah, layering was exactly what I intended to do. It actually looks cute over a baby tee (like in Part 2). I've tried wearing it over a black beater and it gives it a nice funky spin too.
Great blog! I think it's great that you can look so fantastic for so little money. Of course, it helps that you have a great body, etc. etc. If possible, could you include more pictures of the outfits that you wear every day?
Thanks! Unfortunately, editing my daily outfit pics for Blogger is very time consuming, so I won't be able to do that regularly. However, I occasionally post my outfits in relation to whatever I'm blogging about. What you see is what I've actually worn to go about my everyday business. I'll try to do those posts more often.
I dig your blog too...great ideas! I also have that same Geren Ford dress (purchased it at a Billion Dollar Babes sale way back in the beginning of summer and have yet to get around to wearing it). I'm also encountering the too-long strap problem, plus the dress smashes my boobs. Instead of taking in the straps myself (I'm completely inept with a needle), I'm going to take it to the tailor's!
Post a Comment