6.30.2006

Errata: Ignoring Dry-Cleaning Instructions Does Have Consequences

If you've been following this blog, you'll know that I almost always ignore "dry clean only" labels. That's because I've gotten away with washing them by hand without shrinkage. Why bother paying the dry-cleaning bill if I can take care of it myself?

This time, my willful disobedience of instructions backfired on me in the worst way.

Here's my victim, after it was rescued:

Yes, I said "rescued." I can't believe I almost ruined this lovely new Jak & Rae top, purchased during my last trip Loehmann's (see last post). It wasn't very expensive, which was why I was willing to chance washing by hand (I would never do that with my suits). Still, if I did total it, I wouldn't have been able to buy a replacement. Fortunately, this story has a happy ending, but I'm here to let know what to do to prevent a scare in the first place.

I hand-wash things for a number of reasons. First, people have done it for years before dry cleaning existed. Second, most things won't shrink through contact with cold water, despite the "dry clean only" label. Even if a new piece is machine-washable, I do it in order to prevent brilliant dyes from leaching onto the rest of my laundry (since I have to pay to get laundry done most of the time, I save money by not separating colors). However, reasons #1 and 2 need to be reevaluated. True, people have washed lots of fabrics, even delicate ones, throughout history, but that's before man- and woman-kind were able to invent new fiber materials that don't necessarily conform to the laws of nature. Some of those newfangled fibers will shrink if you wash them.

My top was 100% Rayon. I figured that I've machine-washed some rayon-blend clothes before and they came out fine, so hand-washing should be fine. After I washed it and wrung it, I thought, "Wow, this is really heavy! I guess rayon absorbs tons of water!" I hung it on a drying rack, but I grew impatient at the snail's pace of drying. I tossed it into the dryer when my machine-washed load was done. After I took it out of the dryer, I noticed that the front seemed a bit shorter, shoulders were tighter, and the back seam (where the ruffles were gathered) went up 2 inches! I was understandably aghast.

What I didn't know is that rayon has low wet strength, which means it's highly unstable when wet. Therefore, it is susceptible to shrinkage (as much as 10%) or stretchage (is that even a word?). Some types of rayons (like viscose) were manufactured to have better wet strength than others. Apparently the fibers in my top didn't fall into that group.

Take home lesson #1: read the label to figure out what the fibers are, then do a quick Google search on the properties of those fibers. It might be helpful to sample a few sites, since even expert opinions can vary. I found this site to be simple and informative, and I've included the link so that I can reference it in the future. If I had known about the low wet weight issue, I would have carefully dried my top like I would with cashmere sweaters (with a towel, then lay flat) instead of employing expedient yet detrimental methods. If the fibers are really, really unsuitable for water and/or your piece of clothing costs a lot of money, it's better not to take the risk.

After feeling a bit of outrage, I was determined to unshrink this thing. If the fibers can both shrink and stretch, I was sure that I can stretch it back out. I followed TBF's advice on unshrinking a wool sweater (using lukewarm water and hair conditioner) with a few of my own modifications. After I squeezed out water, the top was really heavy, so I gently tugged at it lengthwise. Then, I used a towel to blot out the excess water. The top was laid flat to dry for a few hours, subjected to a few more gentle stretchings over time. When it was mostly dried but still a little damp, I decided to let gravity do my bidding. The top half of the top was flat on the drying rack, but I pushed the bottom half over the edge so that it hangs free. An hour or two later, I let the top half hang down instead of the bottom. By the next day, my top was back to more or less normal size, as shown in the pictures above.

Take Home Lesson #2: If it shrank, don't panic! Do some online research and act quickly.

I consider myself pretty lucky, since not all mistakes are reversable. On that same day, which I should dub the "unluckiest laundry day ever," my Joie pants also shrunk in the dryer. It's now a good fit and has a better length (which is what I wanted), but unfortunately the outside seams are all bunched up. I'll try to simultaneously iron and stretch later, but I don't know if it's gonna work. I'll let you know when I have time to try it.

6.23.2006

"You saved $1302.43 off department store prices"

When I saw that, I was flabbergasted...

Yesterday, I went to the mall to buy birthday presents for a couple of guys (guys are soooo hard to shop for). After finding what I think are fitting of their individual personalities, I still had some time left before my 3-hour limit for parking expired. Hey, I paid for it, so I may as well use it up. Little did I know that I would end up paying more for parking when my stay was unexpectedly extended.

I decided to head off to Loehmann's because I still needed to find some decent work clothes. I've found a really nice but cheap skirt at FIDM the day before (along with a $2.50 Charlotte Russe dress in my size and in perfect shape), but I still needed pants and dress shirts. I can never seem to find dress shirts that are small enough to fit me and long enough to stay tucked in, and I'm sad to say that I still can't.

For every piece of clothing I really needed, I ended up getting something that I merely wanted. Normally this would be a very bad thing, but I made an exception because if I don't buy them now, I'll never be able to afford them. That's because previously unbeknownst to me, Loehmann's just kicked off their Red Star Clearance event yesterday, with an addition 20% off reduced recent arrivals, and 40% off clearance items! Better yet, I got to use my 15% birthday discount. Everything I bought retailed in low 3-digit figures; but for the additional discounts, even the clearance prices would have exceeded my budgetery limits (usually, I'm only willing to buy if the price is around $10 for tops and $20 for pants, with slight upward and downward adjustments based on quality and fit). Even for clothes I need, I am not willing to pay an arm and a leg for them.

By happenstance, I was there on the day the sale started, which meant I got to pick out the good stuff before things got too picked over. There wasn't anything new and exciting in the contemporary or women's section, but the Back Room (where merchandise is usually either too expensive or unappealing to me) was where the real action was at--all sorts of goodies at jaw-dropping prices.

In the end, I bought 6 clearance pieces ranging between $6 to $14. 3 were "need" items: a pair of Joie pants that had a relaxed but not frumpy fit, a suit skirt that practically matches the suit jacket I got at the crazy BCBG warehouse sale, and a "Miu Miu" slip skirt (didn't have a label inside, but that's what the tag said). The pants are a bit long, but now that I know how to shorten them on my own, I don't need to pay the tailor. My 3 "want" pieces were a perfect-fit Milly cashmere-silk blend tube top, a non-classic but timeless Jak & Rae "sweater," and a beautiful Jak & Rae silk top. I'll talk more about the Jak & Rae items in a later post.

Back to the $1302.43 figure--wonder what made it so high? Well, everything I bought retailed around $200-300. Some of them are just pricey based on the designer status, while one is simply unjustified. The two most expensive things, believe it or not, are the skirt and the slip. The skirt retailed $300, but at least it's an Italian suit skirt. The $350 slip, on the other hand, is just your ordinary linen slip. Who pays $350 for underwear, or even the Loehmann's retail of $99? I paid only for its true worth--$6. Unfortunately, as my friend said, there are people out there who are flushed with cash and not care. So very sad...that money could have gone to a better cause.

I spent a lot of money yesterday, and overall this year I've spent a lot of money on "want" items. I'm officially all shopped out. If it's not the perfect dress shirt, I ain't buying. Seriously.

6.19.2006

More Student Loan Drama: The New Graduate PLUS Loan

This post is really for graduate students. More interesting things will come for the general public in about 2 weeks, when I'm done grading the mountain of papers sitting on my desk. The twin monsters of posts on DIY oughta keep people busy for the time being ;-)

If you've read my original post on consolidation on Friday, read it again. I edited a little bit to include more accurate information.

Heading into my last year of school, my finances are starting to look grim. No, I didn't blow my entire fortune on clothes or anything, though I have to admit I did far more bargain shopping for play clothes than I should have this year...bad me. Actually, my woes stem from those little tests I have to pass before getting my license to sue. I just shelled out a chunk of cash for the MPRE, and I don't even want to think about how much I'll have to pay for the California Bar Exam--not just the test itself, but the $3K BAR/BRI review course that everyone takes. I'm pretty sure I'll pass the MPRE because I know better than to commingle funds, become romantically involved with clients, etc., but if I don't pass the Bar, I'll have to fork over even more money to try again. On top of that, I need to find more professional clothes, as my cheapies that served me well for years are starting to give out. Hence, it's time for me to really scrimp and save on what I already have, and I have to account for the extra costs when deciding how much to borrow for next year.

The student loan situation is getting uglier and uglier. Interest rates have gone sky high. I could remember when interest rates of my private loans were as low as 4.something %. On my last quarterly statement, it was well over 8%. Judging by the current economic conditions, I believe that it's likely to go up by a lot more in order to curb inflation (which results in part from overreliance on credit). Even government loans are rocketting upward--those 2.something% days are over. In-school consolidation of federal loans has been done away with. With all these changes and more that Congress is putting forth, it's hard for me to keep track. I'm not thrilled about needing to borrow more money this year when the interest rates are so high.

Fortunately, one new option has emerged for some (but not all) grad students--the Graduate PLUS loans. It's brand new and won't be in effect until 7/1, which means it can't be used for summer school. On its face, the terms don't seem all that appealing: the interest rate is capped at 8.5% for the life of the loan, there's a 3% origination fee, and there's no grace period, which means repayment starts once you're done with school. However, considering how high private loan interest rates already are, it might be worth looking into. The slightly-lower interest rate is certainly a plus, but I'm more drawn to the prospect of consolidation, which can't be done with private loans.

Unfortunately, not all schools offer this type of federal student loan. This is so new that some school administrators may have decided to forgo it to avoid the mess. If the GPLUS loan is something you're interested in, talk to your school's financial aid office. Don't just take my word for it--do your own homework carefully. The lowdown I provided barely scratches the surface--it's just what I heard a few months ago at a workshop plus new documents that got sent to my house, and the laws might have changed (or clarified) since then. I'm confused and will have to pay my school's FinAid folks a visit before rendering a final decision, but I just thought it would be nice to raise awareness of this new program.

6.16.2006

Reminder: In-School Consolidation

For those of you students with federal student loans, June 30 is the last day to file your application for consolidation (you have to do it before July 1). After this year, you won't be able to do in-school consolidation anymore.

If you have student loans and are in school, I'm sure you've heard all about it and I won't need to explain the details. Since interest rates are projected to go up by a lot, it's probably a good idea to consolidate.

Just a reminder, that's all.

Addendum: don't forget to send in the early repayment form! One copy has to go to the consolidating lender and copies have to go to the servicers of each loan you want consolidated.

Fill in all the necessary paperwork and mail it in it TODAY! They have to be received by 7/1. Give all the paperwork at least a week to get to their destinations.

6.15.2006

DIY Projects: Jewelry (Part 2)

[Ed.: This and Part 1 were originally in a single post. I've divided it to make it less bulky.]

Last time I talked about the benefits of making your own jewelry. Today I'll go over the finer details of how to do it. While jewelrymaking is not a hobby to undertake if you're broke, you can maximize the bang for your buck.

No matter what skill level you're at, take advantage of sales and use coupons if you can! When I first got started, JoAnn's had a 30% sale on all jewelry findings, which helped me cut down on the starting costs. Several readers have kindly pointed out that JoAnn's sends out coupons regularly (including 15% on a single item) if you sign on to their mailing list, and I've heard that Michael's has coupons as well (though personally I don't shop there). Some online stores such as Artbeads.com also have weekly specials.

It's also important to do price comparisons. It's relatively easy to compare between e-stores, but don't forget to compare against your local crafts store. Online isn't necessarily cheaper. I'm fortunate enough to have a relatively easy time getting to the Downtown LA Jewelry and Fashion districts, where supplies and gemstones can be obtained much cheaply than online stores or JoAnn's/Michael's. I recommend Bohemian Crystal in the Fashion District (near 8th/Maple) and Bella Finding House (7th between Hill and Olive). Bohemian Crystal is a good place to go for glass crystals, glass beads, and base metal findings. They also sell Swarovski crystals, though I've yet to buy them. Bella's is a good place for precious metal findings at wholesale, even without a resale number. Their semi-precious gemstones are very affordable, but you'll have to inspect carefully to pick out a strand that doesn't have inclusions. Quite a few places along 7th also sell gemstones at wholesale, though some may require you to pay cash only if you don't have a resale number.

If you're just starting out, stick with cheap beads and base-metal findings; don't dabble with precious metal components in the early stages unless you're allergic to base metals. If your ears are sensitive, try using stering earwires, but see if you can use base-metal findings for anything dangling from the earwire. As for the beads, you can get a bag of them from a crafts store, or you can recycle beads from cheap necklaces. Many craftsters like to get cheap necklaces from thrift stores or from the Claire's clearance bins, take them apart, and end up with new and nifty creations.

As you become more proficient, you might want better quality materials to work with. In order to save money, you might want to consider buying in bulk; it works the same way as Costco's or other warehouse/club stores. However, keep in mind that some wholesalers (online and offline) are limited to those in the trade (which means you'll need a reseller's permit from the local authorities), or even if they're open to the public, there might be a huge minimum purchase requirement. Also, when you're buying in bulk, you run the risk of wasting money on things you end up not using or can't use. Before you dive into wholesale quantities, evaluate what your needs are, and buy a few to try them out first. Here are a few things you should consider:

-What components do you use the most? It's probably safe to buy lots of headpins/eyepins, jump rings, crimp beads, and wire, but don't plan on buying lots of bails or crimp ends unless you really use them frequently.
-What kinds of beads do you need the most? It's also important to consider color. For instance, black is one of the most versatile, so it's pretty safe to get lots of black. When it comes to hot pink, it's probably not a good idea to a 10000-pack, even though the price-per-unit is a lot cheaper when you buy bulk.
-Will they keep? It'll do you no good to amass 50-foot spools of sterling silver chain if you can't keep them sealed to prevent oxidation. If you've got no cool storage space for glue, they might dry up.
-Are you really going to use all 1000 jumprings? Be realistic about how much jewelry you make, and how often.

Even if you're good at what you do, if you're coming up with a new design, use cheaper beads and findings to do a model first. You don't want to screw up with the expensive stuff.
Another way to save money is to use "alterative media." Come up with creative uses for small baubles that are lying around the house. Buttons are favorites because they are cheap and easy to work with. I've made a couple of button rings, including the one on my thumb in a picture above. Some people have used washers, marbles, Scrabble tiles, toothbrushes, forks, bottlecaps, you name it. If you're broke and can't afford to buy beads, you might be surprised by how far your creativity can take you.

The best thing about the Internet is the availability of information. Just Google for help. About.com has a lot of tutorials, as with Artbeads and Fire Mountain Gems. Craftster is a place I often visit for inspiration. If you need more free resources, your local library might also have books on jewelrymaking. Some libraries might even have videos.

Have fun! If you have any recommendations for vendors, please do share, but no shameless self-promotions; there's a thing called the "delete" button if your plug isn't legit.

DIY Projects: Jewelry (Part 1)

[Ed.: Parts 1 and 2 were originally all in a single post. Subsequently I realized how bulky it was and decided to cut it in two.]

How often have you seen something being sold for an arm and a leg and thought, "I could make that myself"? The answer probably varies from person to person, but it's safe to say that it has occured a handful of times for most people. That's pretty much how I fell into jewelrymaking. I saw a necklace that was "on sale" for $30; I went home and made my own version for about $3.

I think jewelrymaking is one of the more accessible crafts, with plenty of room for personal growth so that the hobby never gets boring. Beginners can start by stringing beads on a string, then move up to wire-wrapping, maybe even graduating to metalsmithing. However, I think the best part of jewelrymaking is near-instant gratification: if it's a simple project, you'll be able to make something wearable within minutes. If it's a long project, you can put it aside and pick it up again whenever you want; once you resume your project, you'll be able to finish fairly quickly. Jewelrymaking might also benefit you financially. If you're the type of person who is really into buying and wearing accessories, you can save a ton of dough by making your own, exactly the way you like it. Your pocketbook will also thank you come holidays/birthdays. When you make jewelry as gifts for family and friends, you have the added benefit of making your gift recipients feel extra-special because of your personal touch in making something just for them. If you get good enough at it, there's the possibility that a simple hobby can turn into a revenue-generating enterprise, and who doesn't like extra cash? There are other intangible benefits as well. Believe it or not, stringing beads through a string can be very relaxing. Making jewelry was what got me through the past semester, when I was sick and tired all the time. Besides, it gives you a creative outlet and works that right side of the brain, and you'll be filled with a sense of pride that you've created wearable art.

As with any good thing, there are strings attached. The big downside is the potential of runaway expenses, primarily in the startup costs. A cheap set of tools you'll need to get started generally runs between $10-20. As you advance, you'll probably need to replace them with a more precise set. You'll also need stringing materials, which can become expensive. You'll need lots of findings (metal components). Base metal varieties are fairly cheap but can add up when you need a variety of them. If you want precious metal findings (gold, gold-filled, pure silver, or sterling silver), they can be very expensive. However, in my opinion, the greatest expenses are attributed to beads. You want lots of them, and you want lots of different kinds. In order to have more intriguing designs, you'll need a variety of beads; it's hard to be inspired when you only have a pile of brown and a pile of black. You'll need lots of beads because they get used up quickly for necklaces, bracelets, etc. Wood and plastic beads are the cheapest, but if you want to make things that are more sophisticated, you may need to buy fancy glass beads (i.e. Murano), gemstone beads, and Swarovski crystals, which cost more (and in some cases, a lot more). All in all, I spent about $150 procuring my beginner set of tools and starting batch of gemstones, glass beads, and findings.

Fortunately, the benefits generally outweigh the costs, and there are means to keep it that way. The starting costs are a lot, but you can make so much out of it. Here's just some of what I was able to make. I've made so many baubles (and gave some away) that it's impossible to show them all.

The newbie-ish funky earrings:

Something more sophisticated:

Ring-a-ling-dings...

...and a few of my favorite things:


Although my starting materials cost me $150, the end products are probably worth several times over. Now that I make my own stuff, I realize that most of the cost of jewelry is based on labor. Certain pieces (like the black beaded necklace above) can take several hours to make. I certainly understand that jewelry artists need to make a living, so they have no choice but to charge a lot, but for those of us who don't have that kind of money but still want the "luxury," making our own is the only way to get it. Aside from labor, materials cost money, though sometimes the markup isn't justfied by the quality. It's ridiculous to pay $60 for something made of cheap plastic, even if it is one-of-a-kind. In that case, making your own is the way to go. For anything gold-filled and sterling-silver, the savings from DIY are even more pronounced. While precious metal jewelry tend to be more expensive, sterling silver and gold-filled findings are still very affordable. A foot-long sterling chain can be purchased for several dollars per foot from a jewelry supplies store, and all you have to do is to pay pennies for clasps to attach to the ends, add on a few charms for a couple bucks each, and you've got yourself a trendy necklace. If you buy the same necklace in a store, the markup is significantly higher (try anywhere between 3-10X). Note that sterling silver is an alloy (92.5% silver), not fine silver, and gold-filled is somewhat of a misnomer. There's more gold than gold-plated because several layers of gold are chemically bonded to the surface of the wire (usually with a copper core), so it looks better but doesn't cost as much as a real gold chain.

Next: now that I've explained why DIY can save money, stay tuned for the how.

6.12.2006

DIY Projects: Clothing

A while back I started working on a DIY series, but final exams had put a damper on things. I had set aside some notes, but unfortunately I deleted them by accident when I was trying to permanently delete something else. Maybe it's a sign that procrastination is bad =P

So now I've decided to start writing things down before I forget it all.

For most people, style = clothing. It would be nice if we can make our own clothes to reflect our individuality, but for many reasons, it's not very feasible. For one, it takes time to learn how to sew. There are also many expenditures involved, like a sewing machine, tools, fabrics and notions. Besides, many people aren't willing to wait that long before they end up with something wearable.

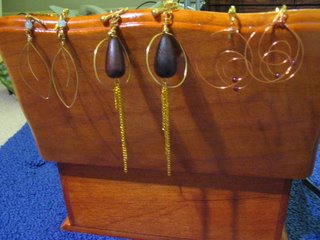
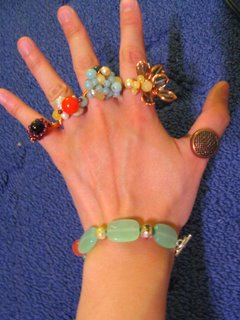
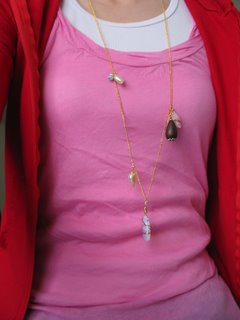
But there are tons of quicker and easier things we can do to our dime-a-dozen store bought stuff, or those old tops and pants that are on the verge of permanent hiatus. We can add simple embellishments like rhinestones, iron-ons, or ribbons. Buttons are also useful in clothing renovation projects. Update old jackets by snipping off the buttons and replacing them with funkier ones (but make sure the buttons you're putting in will fit through the buttonholes). Some people like to sew buttons onto hats, while others create cute new designs on tops and bottoms. If you have fabric scraps, you can do an applique. Cut out a sillouette of say, an owl (which is supposed to be all the rage in the coming fashion season), and sew it onto a bag or t-shirt. If you're artistic, you can do an entire collage with different types of scraps. I haven't had the time to do this yet, but I definitely want to cover up logos on freebie tote bags. You can also make your own graphic tees through stenciling. I was going to do that this weekend but I ran out of time to figure out a good setup (planning is definitely necessary because paints and other supplies can be expensive).

One of the most popular clothing modification techniques involve nothing more than a pair of scissors and some creative snipping. Tees can be converted to tanks, crew necks transformed into boatnecks, jeans can be slashed in a million different ways, and sometimes they turn into cut-offs. This year, bermudas and shorts are huge trends, available in so many different lengths and in so many different fabrics. People are snatching them up like hotcakes. However, it makes no sense to spend money chasing down each trend. You know that shorts are popular every single year when the mercury rises, and the craze over shorts will cycle until whenever global warming brings in the next Ice Age.

To stay current with fashion trends for free, dig into your closet for pants that were once cool but somehow fell out of favor. Converting them into shorter lengths may get you to wear them again. Another option is to hit a thrift store or clearance racks for the cheap something you want to make cut-offs out of. But before you get too scissors-happy, stop and think. It's easy to just snip off a couple of feet worth of fabric, but you might also want them to look nice and not fall apart at the next wash. How short do you want them? Do you want cuffs? What about hemming?

To help you resolve these issues, I've put together a photographic record and some notes. The pictures aren't great--I couldn't tell how bad they were before I uploaded the pictures onto my computer, I can't go back in time to retake the pictures, and they were edited in MS Paint--but they're good enough for the intended purpose. This whole tutorial is based on my self-devised cracker-jack method--I don't know how to sew, but I thought that it's easy enough to figure out how to do it. My explanations are rather crude; I learned how to backstitch with the help of Google right before I started the project, and my knowledge of sewing terminology is practically nil. Hopefully the pictures will help explain what I can't do in words.

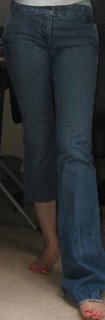
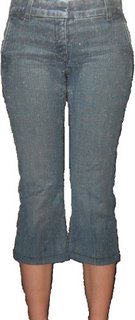
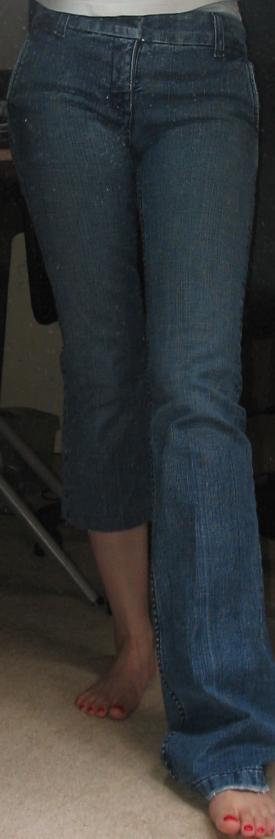
These are the jeans I started off with:


They were way too long, and I was too cheap to take them to the tailor. It was a good thing I didn't because they became rather tight after a while. This might be the result of lack of exercise, but then again, none of my other pairs of pants became tight like this. Anyway, the point is that I no longer liked them. I've wanted a pair of denim capris for a while but never got around to buying them, so this is a good opportunity to get what I've always wanted without spending more cash.

Before you start: you'll need needles, thread, scissors, a ruler, a water-soluble marking medium (i.e. washable markers or ball-point pens), an iron and ironing board, and knowledge of basic stitches.

Step 1: put on the jeans, fold them up to the desired length, check in the mirror, then take them off without unfolding the "cuff."

Step 2: measure the section you've "cuffed," but make sure you do so down the middle of the leg. If you measure the side of the leg, your measurements are going to be off. Boot-cut jeans are shaped like a trapezoid, and the sides of the trapezoid are longer than the height. I decided to cut off 12.5 cm.

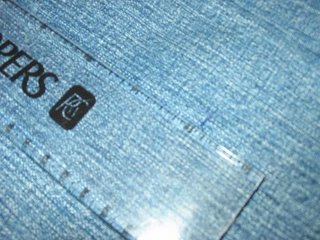
Step 3: Uncuff the pant leg so that the fabric is "right-side up" (the "wrong" side is the inside). Remember the measurement you just made on the "wrong" side? Now mark that length on the "right" side with a writing instrument that can be washed off. If you've got tailor's chalk, great, but if you don't, use children's washable markers, or an ordinary ball-point pen like I did (but be careful not to make marks too heavily). Pencils aren't going to work. It might help to extend that mark to create a short, straight line (see picture).

Step 4: Draw a straight line at the mark you made in Step 3. This line will be hereineafter referred to as the "fold" line (I made this term up).

Step 5a: Do you plan to hem the shorts? If you do plan to hem, follow 5b. If not, just cut at the "fold" line, then put the jeans on to make sure it's the right length. Shorten if necessary. Repeat for the other leg, then move on to 6a.

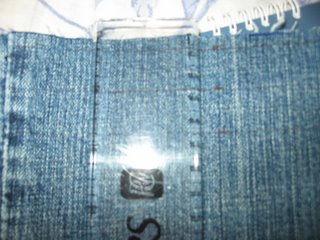
Step 5b: If you plan to hem, you'll need to cut off less fabric. I didn't figure this out until after I snipped; it worked out after all, but don't repeat my mistake! Think about how wide you want your hem to be. I wanted a hem that's 2 cm wide, so I marked 2 cm above and 2 cm below the "fold" line. These 2 new lines will be hereinafter referred to as the "upper" and "lower" "stitch lines" (I also made these terms up). Make another mark about 0.5-1 cm below the "lower stitch line," then draw a straight line--that's where you'll cut off the leg. Put your jeans on, cuff them at the "fold" line to see if that's the length you want. Move on to 6b.

Now a little explanation of why I named these lines the way I did: the "fold" line is where the fabric gets folded over, and the "stitch" lines are where the stitches will be made. You need that extra fabric below the "lower stitch line" so that the upper layer will have something to sew into.

Step 6a: This step is optional, but strongly recommended. It's fine to just cut off the legs and call it quits, but the fraying can become a problem sooner or later. To prevent your entire pair of pants from unravelling in the future, do at least a simple running stitch close to edge. It might take an extra half-hour, but the stitches will keep the fraying at bay. You're all done!

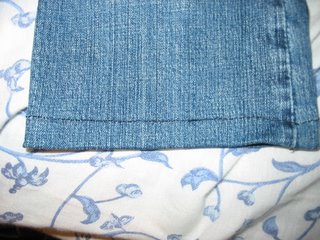
Step 6b: Fold inward at the "fold" line, then use an iron to crease. You might be tempted to skip this and just pin it down with lots of pins or needles, but believe me, a simple ironing job will save you lots of trouble and prickage. Measure above and below the fold lines again at different points to make sure the lengths are still correct, because the crease might be off by accident during your struggle with the iron. If you want both legs to be even, this is a big deal; we're relying on these same numbers for the other leg. Then find yourself a nice cozy chair 'cos it's going to be a long hour or two. I recommend the backstitch because denim needs some strong stitches. Just stitch along the stitch line and you should be fine, but make sure the top and bottom layers are sewn together. Be advised that it's going to be hard along the seams (you can see that my stitches stop being in a straight line around there). If the seams come loose at the point where they've been cut, just set things right with a few stitches. Repeat steps 4, 5b, and 6b for the other leg.

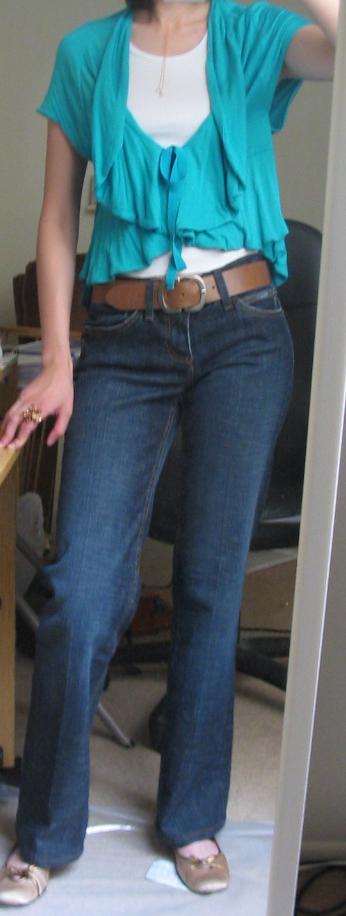
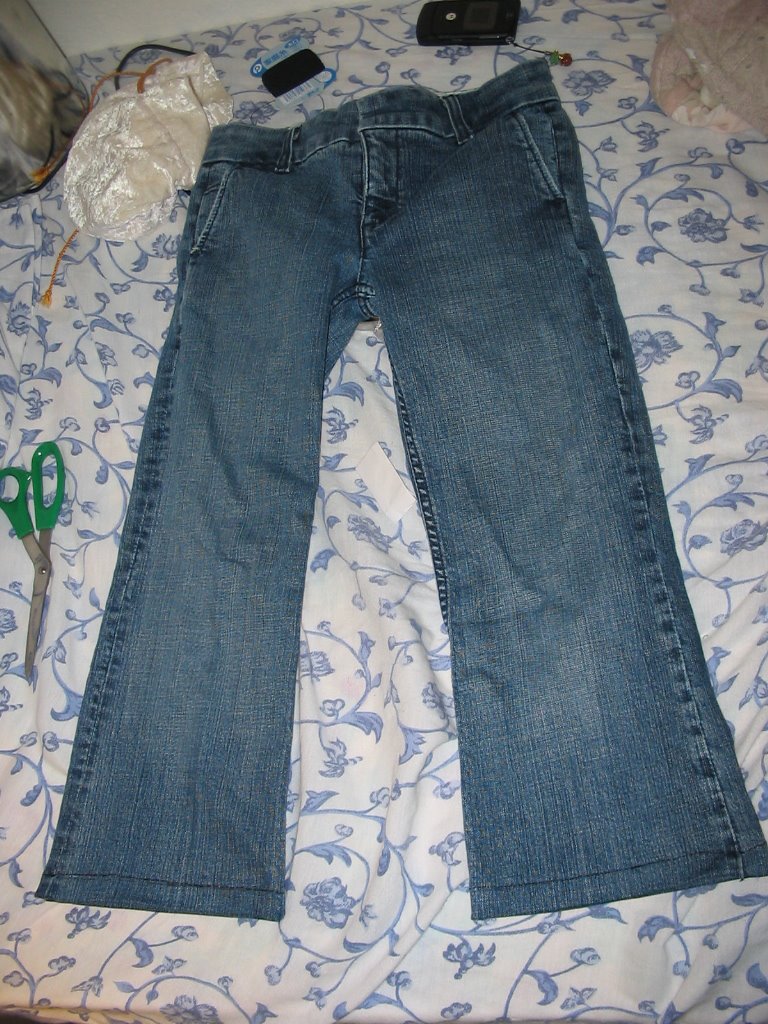
Voila! The finished product!

It took me about 3.5 hours to get this done because I had to figure things out as I go. If I do this again next time, I think it'll take just half the time. 3 hours seem like a long time, but they flew by and I didn't feel it. I think it's a project that you can split into several sittings.

Last but not least, save the parts you've cut off! They can serve as scraps for another project. You might even be able to make a bag with a leg (I envision something like gift-wrapping one end and sewing it shut).

Hopefully these suggestions will help breathe new life into old or abandoned clothing. Have fun!

6.04.2006

Back to Basics

I went to the mall today in search of a good pair of shorts and some print tops to spice up my wardrobe, but instead I walked away with three basic tops for just shy of $10.

Charlotte Russe isn't a place that I'd normally go for clothes. I like a lot of their stuff, but oftentimes the things I like are either not on sale or still not cheap enough. I have to say that I'm quite impressed with their clearance sale. The blue dot items are $2.99 (tops)/$4.99 (pants, dresses), green items were $6.99, and red dot items were $9.99. Tons of shoes were also on clearance at $9.99. These were the prices for the last clearance sale I went to, but the merchandise was just not very impressive. This time, there were lots of work-worthy, party-worthy, and just chill-worthy stuff.

It's hard to say no to basics when they're practical and only $3, and it's even harder once you've tried them on and found the fit to be quite flattering. I figured that v-neck tees in neutral colors are pretty good to wear under blazers or cardigans for work, and people might just think they're shells. The trendy cuts of the tops make them good candidates for DIY projects, too. When everyone else are stenciling on ill-fitting t-shirts, you can have a top that looks like it came from some expensive boutique. Besides, if you mess up, you only lose $3 as opposed to some $10 American Apparel tee (which I love, but I would never pay full price).

Speaking of basics, I'll have to shop for better work clothes. Even though I have a few dress shirts, all of my past jobs (including a law firm clerking gig) had pretty relaxed dress codes. It's different this time around. I really don't plan on wearing suits or twinsets every day, so it'll be a challenge to look professional yet stylish and on a budget.

Speaking of labels...a quick fix

One of my former employers had a quick fix for inadvertent omissions in print jobs. Sometimes it's difficult, expensive, or time-consuming to type things back in and then reprint/make copies of the pages, particularly if the mistake recurs on hundreds of pages. Being the fussy customer that you are, you want things to look good--no unprofessional mess generated by white-out, and nothing handwritten in.

The saviors: clear mailing labels.

The rest is history.

6.03.2006

Sale by (de)fault and lessons learned

This week, I encountered 2 scenarios where the store's fault (or something close to fault) resulted in a discount.

1) I went out to dinner with a couple of friends the other night. When we first got our menus, we noticed something funky. Two of us had menus that looked the same, but the third had a menu where the pages were reversed. On my menu, there's a dish that didn't have a price, but the price was listed on that third "weird" menu. Other than the seemingly minor discrepancies, we didn't think much more of it. We ate, had a merry time...and then the bill came.

The friend with the "weird" menu was charged a dollar more. We asked to have a look at the menu again, but we got one of the "normal" menus with the higher price listed. The lawyer in me screamed "misrepresentation," but since I didn't see the "weird" menu, I couldn't be sure of the price. We asked for the waitress again and explained that our friend was under the impression that the dish wasn't quite so expensive. The waitress explained that some of the menus haven't been changed, and the "best they can do" is to give us a 10% discount. Wow, even better than we thought.

It's really dumb of the management to knowingly keep inconsistent menus. First, it's really deceptive, and it's going to hurt self-doubting customers who don't speak up. Second, if they've been put on notice of a problem and still not change it, they deserve to lose money. If they're too cheap to reprint menus, just white it out and write in the new price. It's really not that hard to do.

Bottom line: speak up when there's a problem! You might end up getting a better deal. If they refuse to own up to their ineptitude, take it out of the tip.

2) My printer is out of toner, but I've been too cheap to shell out the requisite $90 for a replacement cartridge; at that price I may as well spend another $20 and get myself a new laser printer. Hence, I went to school to get my printing done. One of the perks of being on a student publication is that I get to print as much as I want without worrying about running out of money on my account (the down side, of course, is sleep deprivation). $90 vs. free (plus de minimus gas price)...hmmm...

Unfortunately, I couldn't get free mailing labels. I needed my print job to look really professional, and its simply not possible to print onto a huge manila envelop. Off to Staples I went. The trip also gave me an opportunity to pick up other stationary items that I needed.

What I thought would be a short trip turned out to be a 30-minute nightmare.

I spent some time comparing prices and gathering what I needed. Sometimes I wish I'm not such a cheapskate, since I took way too long to figure out what's a better value. It really shouldn't be an epic battle. First, I was ensnared in the price-per-unit vs. overall price conundrum. Should I get 250 2" X 4" Avery labels for $12 or 1000 Staples labels for $20? After much debate, I decided that I would never use all 1000 labels, so the overall price side wins. When I was about to head out to the checkout counter, I saw that the same Avery labels in a different display were only $10. I picked it up and saw that it was made for ink jet printers. Wait a minute...does it really make a difference? I thought about putting it down and heading back for the Staples "for laser or inkjet printers" mega-pack until my senses kicked in. The "special" technobauble that makes it inkjet-worthy only makes the ink dry faster...it doesn't seem to do much else. A label is a label is a label, it's not going pull a Wicked Witch of the East inside the printer or cause anything to explode. This is just like the "makes your hair grow faster" gimmick on shampoo bottles. Hence, I stuck with the Avery "inkjet" labels.

When I went to pay for my stuff, things were looking good: the two types of labels I bought were both cheaper than marked. But the good times stopped rolling as soon I swiped my credit card. It didn't work. Apparently the customer right in front of me had the same problem, but that time they fixed it. When it was my turn, the whole system just went kaput. I felt like a Typhoid Mary who's holding everyone else up, but it wasn't my fault. It wasn't really Staple's fault, either, but it's more like vicarious liability since they operated the store. We tried other registers, and none of them worked. They rebooted the registers, rinsed and repeat, and still nothing. This went on for some time. I would have paid cash and put an end to this madness, but unfortuntely I only had $22 and the items I wanted were quite a few dollars more.

Finally, I said I was going to purchase one less item (envelops) so that I can afford to pay for the rest. I really needed all the other stuff, including the pens that a hard-at-work classmate had asked me to buy. I would have barely scraped by with all my loose change. Fortunately, after hearing how little money I had, the manager profusely apologized and said that he'll give me a discount so that I can afford to pay for everything I set out to purchase. I ended up leaving the store with a dollar and change in my wallet. The guy in line behind me was trying to buy a notebook on his company's credit card, but the machines still weren't working. I don't know if he was smart and played dumb on purpose, but he said he didn't have any cash other than the employer's credit card. The store manager just handed it to him and said "have a nice day." I was quite incredulous. The notebook seemed pretty cheap so making it free didn't seem like a big deal, but I wonder where the manager would have drawn the line?

If they knocked down the prices for the other customers standing in line, that Staples would have lost quite a few dollars, but at least it's better than having their goodwill take a huge hit. They staunched the flow of losses with the customers coming in later. While I was still sorting out the mess, some employees were standing at the door to tell incoming customers about the problem and asked if they had cash.

Despite the frustration, I thought the store handled it very well. The manager and employees were courteous, and I felt that I was fairly compensated for the troubles. Better yet, I saved money for my colleague. Now I have $2 plus change in my wallet.

Take home lessons from scenario 2:
-you might get a better price-per-unit if you buy in bulk, but you'll end up losing money if you know you won't use it. Like my friend said, you'll have a lifetime supply of yellowing stationary.
-Contemplate whether the bells and whistles of a product really make a difference. If they make a product cost more, is the price increase justified? Will you actually use the bells and whistles?
-I can't stress enough the importance of being a patient customer. Yelling and screaming and complaining isn't going to get you anywhere when you know the store really isn't in a position to fix a problem. If you're nice, they'll be nice to you. Even if a discount isn't offered, don't blow your top. Try asking "I've been a pretty good customer. Don't I deserve a break for this?" or words to that effect. If they say yes, that's great, but if not, you can just laugh it off (in other words, you won't look stupid).
-While it's tempting to score free merchandise by saying you have no money, it's probably not a good idea, especially if you're a repeat customer. You'll save a couple bucks, but is it worth steeply depreciating your reputation? In law school, the profs keep telling us it's important to maintain a good reputation, because the legal community is fairly tight-knit and you never know who you'll be dealing with in the future (have you heard about the notorious Diana Abdala yet?). Even if you're not in a small community, you never know who you'll run into again, and it takes only one person who knows you to learn about your dishonesty and cause a lot of problems.

6.01.2006

Book Review: "How to Be a Budget Fashionista"

I haven't read a book for fun for a year. Seriously. My idea of "fun" reading for last summer was "The Spirit Catches You and You Fall Down," which was a depressing yet good read (and I highly recommend it). This summer, I really don't want to touch anything too heavy. The second year of law school is when they work you to death, and true to the maxim, my mental circuitboard was completely fried by the time finals were over. The only print publications I wanted to read were pretty glossies like InStyle and Lucky. For once in my life, I really didn't want to think much at all.

All of a sudden I remembered, oh yeah, I've got a 200+ page book to review! I've been an avid reader of Ms. Kathryn Finney's posts on her website, "The Budget Fashionista." When she offered fashion bloggers a chance to review her new book, "How to Be a Budget Fashionista," I jumped at it. But between the time I requested the book and the time I actually received, it, I started to question my decision. I've just been burnt to a crisp from memorizing hundreds of pages of notes on everything from legal ethics to insider trading, so I have good reasons to be intimidated by "Fashionista's" page count. I didn't know how long it would take me to read it, or whether the advice contained therein would be of any use to seasoned bargained shoppers such as myself (modesty be damned).

As it turns out, plowing through 222 pages was no drudgery at all. The font is big, but the book itself isn't. Within the 2 hours after I tore open the package, I read more than a quarter of the book already. I finished the rest of it whenever I had time over the next 2 days. After reading the first few pages, I knew that me and my book were going to get along juuuust fine. Ms. Finney knows how to establish rapport with her audience in an intelligent and humourous manner, drawing from personal shopping anecdotes and "help!" letters from readers that we can all relate to. She also incorporates interviews with industry insiders to put readers "in the know."

The very beginning of the book is perfect for the recovering shopaholic who is absolutely clueless about how to start saving money. As I read on, I recognized a lot of material that was lifted directly from the TBF website. However, it would be a grave mistake for long-time bargain hunters to dismiss the rest of the book as a rehash of what they already know. It is equally mistaken to say, "there's nothing new, I saw it on the website already." In fact, I learned a thing or two, or three, as demonstrated by the complimentary Lexis-Nexis tabs I stuck onto the pages.

Also, the book is more than just a print version of the web content. The "old" material is organized into a logical "big picture" structure, and serves as an intro to caboodles of new and intriguing information. Case in point: before I read this book, I had no idea that you can make money as a mystery shopper. Even though I don't intend to make money this way, it's still good to know I have that option. Additionally, my knowledge on consignment stores and thrifting have certainly been expanded.

I like how Ms. Finney's book is comprehensive without cramming too much down our throats. My favorite parts are the tables, especially the ones that match up expensive designer brands with cheap (or at least cheaper) alternatives. The tables get the point across without being wordy like me. For those who prefer the "skipity hop" reading method, the important parts you need to know are prominently highlighted as "budget fashionista tips." Furthermore, the ending wraps up nicely and reminds readers of the golden rules. The book is a fun and easy read, but easy does not equal to lazy: it covers a lot of ground. Being a Budget Fashionista is more than knowing how to save money--it's saving money AND looking fabulous. Therefore, Ms. Finney also discussed beauty tips, clothing care, styling, how to tell the Real McCoy from knockoffs, the importance of having clothes (including undergarmets) that fit, and so on. Speaking of fit, I'm usually skeptical of the one-size-fits-all label, but I do think that "How to Be a Budget Fashionista" is as one-size-fits-all as a guidebook can be. Ms. Finney covers cheap alteratives for different style types, different body types, and different lifestyles/budgets. Fashionistas of all ages can appreciate the book.

Finally, the book is sold for an affordable $10 on Amazon. A movie ticket costs about that much, but it offers fewer hours of entertainment and you can't keep the movie. As I've mentioned before, I think this book is perfect for someone who is starting out with bargain shopping, but it certainly has a lot to offer to bargain vets, especially those who want to move on to higher-end merchandise. It's an organized and fun read, and I know that I'll pull it out time and again as a reference. I thoroughly enjoyed the book, and I hope you will too.

Happy reading!