So now I've decided to start writing things down before I forget it all.
For most people, style = clothing. It would be nice if we can make our own clothes to reflect our individuality, but for many reasons, it's not very feasible. For one, it takes time to learn how to sew. There are also many expenditures involved, like a sewing machine, tools, fabrics and notions. Besides, many people aren't willing to wait that long before they end up with something wearable.
But there are tons of quicker and easier things we can do to our dime-a-dozen store bought stuff, or those old tops and pants that are on the verge of permanent hiatus. We can add simple embellishments like rhinestones, iron-ons, or ribbons. Buttons are also useful in clothing renovation projects. Update old jackets by snipping off the buttons and replacing them with funkier ones (but make sure the buttons you're putting in will fit through the buttonholes). Some people like to sew buttons onto hats, while others create cute new designs on tops and bottoms. If you have fabric scraps, you can do an applique. Cut out a sillouette of say, an owl (which is supposed to be all the rage in the coming fashion season), and sew it onto a bag or t-shirt. If you're artistic, you can do an entire collage with different types of scraps. I haven't had the time to do this yet, but I definitely want to cover up logos on freebie tote bags. You can also make your own graphic tees through stenciling. I was going to do that this weekend but I ran out of time to figure out a good setup (planning is definitely necessary because paints and other supplies can be expensive).
One of the most popular clothing modification techniques involve nothing more than a pair of scissors and some creative snipping. Tees can be converted to tanks, crew necks transformed into boatnecks, jeans can be slashed in a million different ways, and sometimes they turn into cut-offs. This year, bermudas and shorts are huge trends, available in so many different lengths and in so many different fabrics. People are snatching them up like hotcakes. However, it makes no sense to spend money chasing down each trend. You know that shorts are popular every single year when the mercury rises, and the craze over shorts will cycle until whenever global warming brings in the next Ice Age.
To stay current with fashion trends for free, dig into your closet for pants that were once cool but somehow fell out of favor. Converting them into shorter lengths may get you to wear them again. Another option is to hit a thrift store or clearance racks for the cheap something you want to make cut-offs out of. But before you get too scissors-happy, stop and think. It's easy to just snip off a couple of feet worth of fabric, but you might also want them to look nice and not fall apart at the next wash. How short do you want them? Do you want cuffs? What about hemming?
To help you resolve these issues, I've put together a photographic record and some notes. The pictures aren't great--I couldn't tell how bad they were before I uploaded the pictures onto my computer, I can't go back in time to retake the pictures, and they were edited in MS Paint--but they're good enough for the intended purpose. This whole tutorial is based on my self-devised cracker-jack method--I don't know how to sew, but I thought that it's easy enough to figure out how to do it. My explanations are rather crude; I learned how to backstitch with the help of Google right before I started the project, and my knowledge of sewing terminology is practically nil. Hopefully the pictures will help explain what I can't do in words.
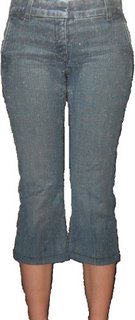
These are the jeans I started off with:

They were way too long, and I was too cheap to take them to the tailor. It was a good thing I didn't because they became rather tight after a while. This might be the result of lack of exercise, but then again, none of my other pairs of pants became tight like this. Anyway, the point is that I no longer liked them. I've wanted a pair of denim capris for a while but never got around to buying them, so this is a good opportunity to get what I've always wanted without spending more cash.
Before you start: you'll need needles, thread, scissors, a ruler, a water-soluble marking medium (i.e. washable markers or ball-point pens), an iron and ironing board, and knowledge of basic stitches.
Step 1: put on the jeans, fold them up to the desired length, check in the mirror, then take them off without unfolding the "cuff."
 Step 2: measure the section you've "cuffed," but make sure you do so down the middle of the leg. If you measure the side of the leg, your measurements are going to be off. Boot-cut jeans are shaped like a trapezoid, and the sides of the trapezoid are longer than the height. I decided to cut off 12.5 cm.
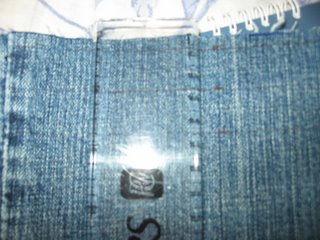
 Step 3: Uncuff the pant leg so that the fabric is "right-side up" (the "wrong" side is the inside). Remember the measurement you just made on the "wrong" side? Now mark that length on the "right" side with a writing instrument that can be washed off. If you've got tailor's chalk, great, but if you don't, use children's washable markers, or an ordinary ball-point pen like I did (but be careful not to make marks too heavily). Pencils aren't going to work. It might help to extend that mark to create a short, straight line (see picture).
Step 4: Draw a straight line at the mark you made in Step 3. This line will be hereineafter referred to as the "fold" line (I made this term up).
 Step 5a: Do you plan to hem the shorts? If you do plan to hem, follow 5b. If not, just cut at the "fold" line, then put the jeans on to make sure it's the right length. Shorten if necessary. Repeat for the other leg, then move on to 6a.
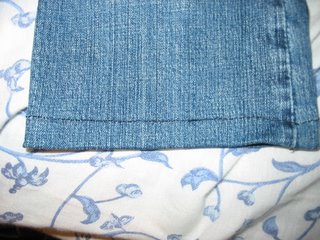
 Step 5b: If you plan to hem, you'll need to cut off less fabric. I didn't figure this out until after I snipped; it worked out after all, but don't repeat my mistake! Think about how wide you want your hem to be. I wanted a hem that's 2 cm wide, so I marked 2 cm above and 2 cm below the "fold" line. These 2 new lines will be hereinafter referred to as the "upper" and "lower" "stitch lines" (I also made these terms up). Make another mark about 0.5-1 cm below the "lower stitch line," then draw a straight line--that's where you'll cut off the leg. Put your jeans on, cuff them at the "fold" line to see if that's the length you want. Move on to 6b.
Now a little explanation of why I named these lines the way I did: the "fold" line is where the fabric gets folded over, and the "stitch" lines are where the stitches will be made. You need that extra fabric below the "lower stitch line" so that the upper layer will have something to sew into.
Step 6a: This step is optional, but strongly recommended. It's fine to just cut off the legs and call it quits, but the fraying can become a problem sooner or later. To prevent your entire pair of pants from unravelling in the future, do at least a simple running stitch close to edge. It might take an extra half-hour, but the stitches will keep the fraying at bay. You're all done!
 Step 6b: Fold inward at the "fold" line, then use an iron to crease. You might be tempted to skip this and just pin it down with lots of pins or needles, but believe me, a simple ironing job will save you lots of trouble and prickage. Measure above and below the fold lines again at different points to make sure the lengths are still correct, because the crease might be off by accident during your struggle with the iron. If you want both legs to be even, this is a big deal; we're relying on these same numbers for the other leg. Then find yourself a nice cozy chair 'cos it's going to be a long hour or two. I recommend the backstitch because denim needs some strong stitches. Just stitch along the stitch line and you should be fine, but make sure the top and bottom layers are sewn together. Be advised that it's going to be hard along the seams (you can see that my stitches stop being in a straight line around there). If the seams come loose at the point where they've been cut, just set things right with a few stitches. Repeat steps 4, 5b, and 6b for the other leg.
Voila! The finished product!
It took me about 3.5 hours to get this done because I had to figure things out as I go. If I do this again next time, I think it'll take just half the time. 3 hours seem like a long time, but they flew by and I didn't feel it. I think it's a project that you can split into several sittings.
Last but not least, save the parts you've cut off! They can serve as scraps for another project. You might even be able to make a bag with a leg (I envision something like gift-wrapping one end and sewing it shut).
Hopefully these suggestions will help breathe new life into old or abandoned clothing. Have fun!


4 comments:
great job! i like them. i will definitly use your tutorial because everytime i try to revamp some old jeans, they come out looking like crap, lol. this is very helpful.
Thanks! I'm glad that my little experiment can help other people.
My absolute favorite pair of jeans from the past few years have become too worn and faded to be much more than just casual jeans, so I recently cut them off right below the knee to make them into long shorts. This was I don't have to go out and buy a pair, and I get to wear them all summer long! =) I've done this before to make capris. I haven't tried hemming anything yet.... Sewing seems intimidating, but perhaps I'll have to look into this.
Hemming is actually not that bad. The stitching is easy to learn. Creasing with the iron definitely made sewing by hand easier.
Post a Comment